My apologies for another dead zone period. My wife had major surgery and remains in the hospital, for more than a week now. Hence, my absence from posting. I have a new Arizona Scenic print in the early stages of printing.
Thank you for visiting.
My apologies for another dead zone period. My wife had major surgery and remains in the hospital, for more than a week now. Hence, my absence from posting. I have a new Arizona Scenic print in the early stages of printing.
Thank you for visiting.
In between working with the gum prints, I have once again begun working with the palladium toned Kallitypes again. Palladium, now more than three times more expensive these days, leaves me with using palladium for toning, only. Today, palladium costs the same as what platinum used to cost, two years ago. Now, palladium is at $10/ml. It takes 1ml for an 8"x10" print. It takes 2 1/4ml for an 11"x14" and 2 1/2ml for an 11"x17". Making an "11x14" print would cost $25. Not on my budget.
As a reminder to those not familiar with working with precious metals is that the noble ones, replace the lessor ones, completely. Meaning, a silver based Kallitype, when cleared, then toned in a 5% palladium toning solution, the palladium metal salts completely replace the silver salts in the print, leaving only palladium, as metallic palladium. A palladium print; known as "the poor man's palladium", which, I might add, has a long and storied past, mostly after the turn of the 20th century, when platinum and palladium printing was quite popular, used a lot in portraiture. Platinum and palladium prints have a archival lifespan of 500 years.
The prints I consider for the 11"x17" format were all digitally captured, mostly with my Canon 20D. It's been a good companion for twenty years. I have not found a way to convert an digital length image, from a 2/3 CMOS image, which is slightly longer than the older standard of 11"x14". I edit what I want in the photograph, and from what angle and h eight, so cropping simply ruins the image, for what was intended to be seen. Altering the image through Paintshop Pro X9, merely distorts it, enough, that I wouldn't print it and put it with my artwork. So, I've succumbed to simply printing the full length, which simply means using more of the Arista II 7mm film I print my negatives on. That OHC transparency film comes in 11"x17", making it pretty ideal for printing digital images.
This print was printed on Revere Platinum paper [140lb/sq ft-320g/sq m] A very fine paper for making hand coated prints. It was developed in sodium citrate 20%, then cleared in EDTA 3%, before rinsed and toned in a palladium toning solution 5%, for 9 minutes. It is a top-down toner, with blacks last.
Palladium toned Kallitype
"The Stone House II" ~ 11"x17"
South Rim, Grand Canyon, Arizona

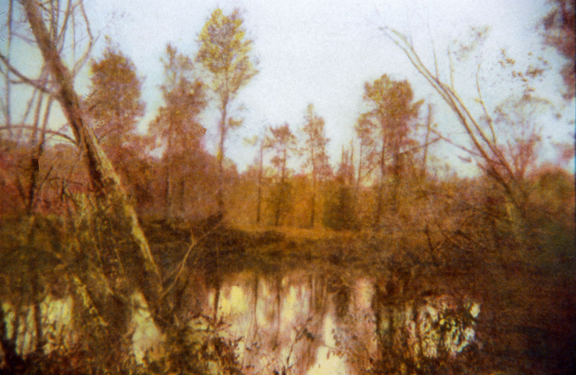
This print is of an earlier era of my gum printing; from 1983. The gum prints I made nearly forty years ago, were not the same as the prints I make today. They were all full layer coating, using the basic CYMK printing format, using a single b&w negative, same process I use today. The defining change came with this print. This print began as a CYMK four layer print, before adding locally applied color(s). The trees in the background are not layers of colors. The numerous colors were applied using a very small, pointed brush, dotting the colors on individual leaves on the trees, using a magnifying loop.
The final touch, was using a very shear mixture quinacridone gold, the color of sunlight, brushed over the center of the image, including mostly the pond area, where the light was falling, to accentuate the effect. I knew the variables of control for gum printing at the time, but just the straight forward, historical application. This print was a test. A sticking your neck out, try it and hope for the best, being the risk was worth the reward, if I didn't make a mistake. That print took thirteen print layers and over twenty color mixes before it was finished. And yes, my inspiration for this derives of my love of Impressionism. That has been the goal since I began printing. This print was the first attempt at that technique.
The printing paper I used back in those days was Arches Hot Press watercolor paper, sizing the paper with two dips in a 2 1/2% gelatin solution. Back then I didn't preshrink the paper. Most of the early prints were simple four print layers using CYMK colors. They were also 5"x7" prints on 8"x10" sheets of rag paper, so there was little, to no shrinking, interfering with the printed image. The negatives went through a Burke & James 5x7 view camera. These days, the digital negatives I make, print 11"x14" gums on 15"x19 1/2" sheets of Fabriano Artistico rag paper, and that does shrink, about 1mm-2mm after several applications in water. I preshrink the rag paper three times, fully drying overnight, then put them through two submersion dips in Know Gelatin 2 1/2%, which sizes the paper at the right level for applying a 50% mixture of gum/dichromate mixture. Commercial, premixed gum, is 14 Baum, approximately a 37% mixture. One dip in 5% gelatin, is not the same as two dips in 2 1/2%. The sizing needs to match the gum mixture.
The gum printing I do today, continues the work I did with this print, using the same techniques. The thirty years in between printing back then, and now, hasn't lessened my passion for this process. Gum printing remains the rarest of all photographic printing processes being done today. Along with that, all my gum prints are unique, no copies, no artist's proof. Just the one print image. For me, that makes them more inviting for serious collectors. Being gum prints can last up to a thousand years, there be plenty of time for that to happen, regardless of who owns the prints in the meantime.
Gum Dichromate Print
"The Quiet Pond" ~ 5"x7"
Eugene, Oregon 1983
This gum print was a very complex image to print, outside the CYMK format, using full coating layers. Any gum printer will see immediately that full layer coating, stacked however many times, cannot separate colors in such a way. As I've noted many times, I am effectively color blind to red/green, as are the majority of men, to some degree. I make gum print theoretically, according to subtractive color theory; based upon a CYMK format for many of the images in the beginning, branching off to work with isolated sections to enhance, or alter the color to something desired.
I began preparing the paper for the print on July 1st, clearing the print, before drying, on the 30th. I will say this about making gum prints of this complexity; not sure I would attempt it again, unless it be an image really dear to my heart. This print is the second print of a three print series of the Native Dancers. I have to say, I find the first print, a gum over palladium version, to be more to my liking. That print was about a dozen posts past. The final one will be the same.
As I've also noted, probably enough to annoy, is that gum printing is no different from other artistic formats, painting, in oil, acrylic or watercolor. Especially watercolor, being it is also based upon the subtractive color theory. A gum print is a photographic watercolor. The print image is formed and shaped by the color palette chosen, and all the other critical steps that shape the finished print. There being eight factors that controls and shapes gum printing. Listed below;
The Paper, sizing, density range of the negative, color layering format [color choices each layer], density of the color/gum mixture, and, amount of gum-mix laid on the paper, printing time, floating time, and water temperature. There are actually more, but not primary variables. Each of these variables can be controlled to the printer's advantage. The process is well known; mix a color in the gum, mix that equally with potassium dichromate [some use ammonium dichromate as it's more sensitive; 'faster'] print under a negative the size of the desired image, then float on water until the gum not affected by the UV light, has floated away, leaving the rest of the print intact.
Technique; is coming to understand the controls of the process, using them to shape the printing through each step, to realizethe pre-visualized image intended. When I read a take on gum printing, with the theme being; "try this out, and see what happens, one never knows what you might get". Do not believe that. That derives of a person who has attempted gum printing, learning the basic process, without understanding the variables that control said process. I won't mention from where I saw the instructions for gum printing, that were so ludicrous, so outside actual gum printing I really couldn't believe it derived of a academic institution with alternative photography classes. It was disheartening.
I have created a "page" on this blog, laying out the process of Kallitype printing, and Salt Paper printing. I have considered doing the same for gum printing, but have hesitated, simply because there are no real boundaries, nor "this is how you do it" beyond how to mix the gum/color/dichromate and brush it on paper. The printing approaches and possibilities are literally endless, and come of artistic expression. This, is why a gum printer is unique. No two printers are alike, leaving a recognizable image of the printer, due to 'technique'. Even attempting to explain the fuller controls of the eight variables would take, well, 91 pages, which is the length of the book I wrote on gum printing. The fifth is the series on photographic processes; The Alchemist's Guide series. Yes, that was a shameless plug, but I am slowly learning if you can't find your horn to toot on once in a while, no one can find your work.
This print was made on Fabriano Artistico 140-lb Hot Press watercolor paper. It consits of twenty-two printing layers using over thirty color mixes. It was printed in the UV printer I designed and built. It has eight 24" T12 20W UV white blacklight tubes. Those are no longer made. Now the T-8 is standard. The defuser sheet is 1 1/2" below the tubes, and the defuser sheet is 6" from the table top. The digital print negative was printed on the Epson 1430 [13"x19"] using a density <curve> I use for Kallitype printing. It was snappy, with a print time of 15-17 minutes, depending on the highlights being printed, using 68ºF-floating water. Normally, I use a shallower <curve> with a print time of eight minutes.
Gum Dichromate Print
"Native Dancers" ~ 11"x14"
Tucson, Arizona
