Thursday, February 15, 2024

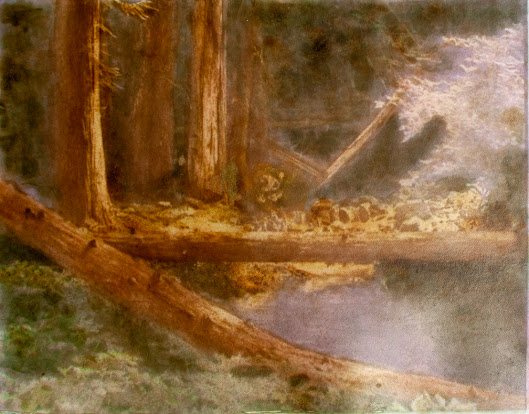
"Willamette River Upstream" ~ Gum Dichromate Print

 This print was even more complex image to print than "Proxy Falls", and that print was quite complex. Complex, in the numerous color variations of the elements, as well as the different tonal levels to consider, and all of those variations had to be mentally mapped out, layer by layer, with the various print times for each different tonal level that was being worked on. The print time controlling only the level affected, as well as the tonal levels below. The tonality being printed to being the level most affected by the float time, which is further controlled by the water temperature of the float water. The lower the temperature of the water the less affect of gum reduction. At 68 degrees, about the only gum reduction would be at the highest level printed to. If that be zone 7 [whites with full texture], then 1-3 minutes of floating would reduce only the gum at that level, all the lower tonal areas would be hardened by the cool water.

The print being seen is not the first attempt at printing. The first print I made was darker and simply overworked. That is because I hadn't gotten the print times down close enough for the control necessary to leave the gum where it was needed, without needing a second coating, hence darkening the image. Gum printing is the most complex photo process there is. There are no 'standard' ways of printing, endless possibilities and no boundaries. After forty years the process has become almost second nature, evaluating each addition of gum to a  print after careful evaluation and thought. Half being the methodological part; how much color in the gum mixture, where applied, how much print time to keep the gum there, with just enough reduction to allow the excess color to come off, leaving just what was desired. And all that, to arrive at the ideal finished print in you head, to translate onto the paper with good fidelity. Previsualization being the term I learned when I began as a photographer.

This print was achieved in ten print layers, using colors. The basic image was created with a standard CYMK printing, although I reversed that order for this print, using KMYC, laying the black first and only printed to zine 3; print time 3 minutes. The magenta was laid on next and printed for eight minutes, which was to about zone 6, below the sky being printed in Most of the sky area are clouds, so they amount to zone 7 (ish) white with texture, here, being the soft turquoise blue of the sky. The focal elements in the print are in the center area, on the left/center is where the late afternoon sunlight is on the far shore of the river and rocks crossing. On the right are several trees in direct sunlight, standing out as being bright. Those I kept the printing times below their tonal range, which would have been zone 7-8. They got the last of the printings, with very shear colors, to keep the brilliance of the light. For me, it's all about the lighting.

Thus, this  print has taken two months to see a final print. That's just how fine gum printing demands. Patience is truly the underlying virtue to gum printing. For those who are in a hurry or impatient, they'd hate it.

Gum Dichromate Print 11"x14"

"Willamette River Upstream" 


Monday, November 13, 2023

"Proxy Falls" ~ Gum Dichromate Print

 I have narrowed the pace of printing, beginning with this  print, from four prints at a time, down to just the one print I'm working on. No need to say that this arrangement is so much easier on my constitution, and I believe to the detriment of printing itself. Divided attention while juggling four multi-layered prints, I am learning, dilutes the focus and attention to detail and planning as focusing on a single print with its set of defined needs, to arrive at the print image desired.

This image originated as a black and white negative; exposed in a Burke & James 5x7 view camera; circa 1984. In the early 2000's, during the last ten years of working with digital imagery, I digitally  hand colored this image, and the one to come next. I liked what I saw, in spite of my having been a black & white printer. It was very recently, during a perusal of some old images worthy of gum printing, and came across the images, realizing gum colors would work quite well with the image. The task would be containing the light in the scene,  holding the print values to show what the light was doing, and the effect of the light on the setting in front of me when I captured the image.

One of the things I may not get right are the digital copy of the print, trying to make the digital image, the fidelity of the colors. Being red/green color blind doesn't help me in that endeavor. I believe I am very close to the lighting and colors of the print. I am using north light when digitally photographing the print.

This print consists of fifteen color print layers, using twenty color mixtures. It is printed on Fabriano Artistico rag paper. sized with two soaks in 2.85% gelatin at 110 degrees F. It is with this print that I began working with various densities of the gum  mixture; into 50%, 75% and 100% gum mixes. Yes, very thick, at 100% like raw honey at room temperature. But, it allows for local applications, using dobbing brush techniques to enhance an area, or even create a sort of textural effect to the image. Such is a 'green bush' center background of the image.

Most of the fuller layers, as well as much of the local applications to the flora in sunlight, the trees, and the branches of the trees in the background were of the 75% gum mixture applications. The proceeding image will have more layers of 50% gum mixtures, as historically done in the past, as I added a final soak of 4% gelatin in 110 degree water on top of the two soaks at 2.85%, as historically done. I am happy with the final results.

Gum Dichromate Print ~ Unique

"Proxy Falls" 11"x14" 

Proxy Falls, Oregon ~ Circa 1984


Tuesday, October 24, 2023

Adaptation and Experimentation

 The new prints arrive slower these days because I no longer make more than one print at a time now. It wasn't so long ago I worked with four prints at a time; two 8"x10"'s and two 11"x14"'s. Considering my age and how long I've been making gum prints, as well as the body of work I've produced, I'm in no need of hurrying anything.

Over the past years, I've lost interested in producing images that look like the original scene or how the subject appeared. My interest is with the light, on the setting or the subject. The Pictorial Effect; setting the lighting conditions to create a mood that connects with the viewer, eliciting an emotional connection with the image. That's the theory.

I have manipulated all of the variables that controls gum printing. There are no boundaries or rules to follow in gum printing. There are but the choices made during the printing, taking an image in a particular direction. Those variables are paper choice/sizing, gum mixture [viscosity], color choice(s) & order of application per print layer, floating time and water temperature. Each one of those variables shapes how each color application turns out, how close to the surface of the paper the image lies, the breath of the tonal range and color separation, color saturation.

As I have demonstrated in some prints, the image can have a full tonal range, and yet, be a 'soft' image, falling into the paper somewhat. "Lady in Light" being an example, or the three Tulip print images. For me, the most successful such print image was "Capt Jack". The color choices and the soft dreamy image of a red cat sleeping & dreaming. Printer's choice.

With the thinner sizing on the current paper of a scene I want to go beyond the standard print. An Oregon scenic in a Douglas Fur stand, with water and rocks, forest floor plants and a bush lit up by direct sunlight. Each leaf and other objects are all being colored with a very small brush. Makes things really stand out, and I get to embellish where I want. The variable I am manipulating is the gum mixture. For many years I mixed my gum at 50%. The commercial gum bought in the bottle is 14 Baume, or approximately 35%-37%. That just wasn't staying on the paper surface, so I mixed a batch of gum at 100%.

A gum  mixture of 100%, using raw crystals currently sold, which has a slight amber hue, has the consistency as unfiltered raw honey. Not easy to work with. Helps to learn a few tricks when getting it into a mixing vessel. Mixing a water color in this thick gum makes a sticky paste and it does not take a lot of said watercolor to create a rich color that is still transparent, allowing light to get through. Once enough color is mixed such that it becomes opaque, That is what will remain on the paper, over whatever textural detail was underneath. The textural detail can't show through a solid color. The color mixes need to be translucent. If you can see through the color mixture, you're on the right track.

I now have three mixed batches of gum; 50%, 75%, and 100%. Each can be used for a specific task, with the thickest used to 'dob' on an area where some actual raised texture would enhance the image. The thinner mixtures used for color larger areas. What remains constant is the print time and float time/temperature, to control at which tonal level the printing will affect, remaining on the paper after floating. One drawback from using very thick gum coatings. Thick gum layers will tend to show cracks after enough layering has taken place. Looks like an old oil painting centuries old. Which could be pretty cool if done right.

I haven't brought up water manipulations, for removal of more gum than is coming off during floating. Turning the paper image up, holding each side of the paper and moving the paper back and forth, lifting and pushing the water back and forth speeds up gum removal. If the water temperature is warm [78-82 degrees] gum will begin reducing in the top half of the tonal range, give or take. If the water temperature is [68-70 degrees] the gum reduction is reduced to pretty much the highlights, and then, slowly. Running water from a tap can reduce fairly quickly over an area or more, depending on the angle of the water stream to the paper, the flatter, more direct on, the more reduction.

I am approximately halfway through the "Proxy Falls" image from an Douglas Fur stand in Oregon. What I have learned, over the forty years I've been making gum prints is that the learning never stops. This is simply because gum printing is the most personalized form of photographic print making. No two gum printers are alike. This, for me, is what makes gum printing so special.

For a fuller viewing of my gum print work; visit my website; https://www.gmichaelhandgisphotography.com 


Tuesday, October 3, 2023

"Tiger Daylili" ~ Gum Dichromate Print

 The second image of the recent printing, one more flower up close. The color of this image was entirely made up of layers of quinacridone burnt orange, and should, theoretically be of an orange color. However, my color seeing source for my prints tells me that the overall color is closer to brown. Not what I had hoped to hear. Sometimes it is painful to ask, cuz I know I'll get an honest answer, and likely not what I was hoping for.

The importance of the print images, especially the flowers, is the light; what the light is doing to the flower,  how it comes through the flower in places. The coloring, well, I work to get things close to what I see in the world, being almost color blind to red/green colors. Not exactly the same as a blind race car driver or pilot, but not helpful either when printing with colors.

This print is also over ten print layers, but using only Quinacridone \burnt orange; hence, my expectation my flower would turn out in the vicinity of orange. One would think anyway. Thus my orangy brown print is what it is, like it or not. I did keep the brilliance of the image, again, a focal point of the printing.


Gum Dichromate Print ~ Unique

"Tiger Daylili" ~ 11"x14"


Sunday, October 1, 2023

"Room into the Sky" ~ Gum Dichromate Print

 More weeks of work has brought two new prints to fruition. I continue to print the gums to 11"x14", likely nearing the lifespan of my printing. I have two new print images set up and ready for printing. These two prints are forest scenes of Oregon; trees, rocks and water. My favorite. These two prints will be printed in the same method of the final print I made over thirty years ago, using a 2X loop and tiny brushes to add color to every single leaf and object in the scene.

That will take several weeks to accomplish, and may be the final prints I make. I've been printing for over forty years now, and the prints I make are from the old world, art that is no longer understood nor appreciated, leaving me to print for the past seven  years for my own accomplishment and satisfaction. Such is life.

This image was taken about  fifteen years ago at Tumacacori, Arizona, a current museum site for the old church that was built during the 18th century by Father Kino, who also built San Xavier, the "Dove of the Desert". That just may be forthcoming, if I'm inclined to continue  printing. This print consists of over ten print layers to arrive at the finished image.

Gum Dichromate Print ~ Unique

"Room into the Sky" ~ 11"x14"

Tumacacori, Arizona